
Hello!
Tuta FAQ
Yes, Tuta supports two-factor authentication with U2F and TOTP. Here are details on how to set up your second factor in Tuta.
Go to Settings → Email→ Scroll down to Email addresses → Click "Show" → Click on the plus symbol.
A pop-up opens where you can create the alias email address you want to add. Click on the arrow button to choose the domain for your alias. This can be any of the Tuta domains or of your custom email domains that you have added to your Tuta account. Alias email addresses with your custom domain do not count towards your limit; you create as many as you like.
Please note: It is technically not possible to delete alias email addresses created with a Tuta domain. These can only be deactivated. Deactivated aliases remain linked to your account in case you want to activate them again in the future.
Go here in Settings. You can choose the 'Default delivery': Encrypted ('Confidential') or not encrypted ('Not confidential'). You can also switch whether an email is encrypted or not when composing the email by clicking on the lock symbol. Emails to other Tuta users are always encrypted by default.
Yes. Tuta uses a preshared password for sending an encrypted message to an external recipient, i.e. to someone who does not use Tuta. Please check here to learn how to send encrypted emails to external recipients.
Or watch our quick YouTube tutorial.
Here we explain how to switch the default so that emails to external recipients are sent not encrypted and without a password.
Yes, when sending emails from Tuta to Tuta, all emails are encrypted automatically end-to-end on your device. You do not have to enter any passwords.
Check out our quick YouTube tutorial to see how it works.
Yes, Tuta Mail is forever free with 1 GB of free storage for private users. The actual free storage is much higher as we are compressing your emails.
After signing up for Tuta as your new email address, you can easily switch important conversations over from your previous provider. Simply forward all emails from your previous email account to Tuta. Here is an explanation of how you can activate this process in your old email account:
You can register for Tuta here. Upon registration you can choose whether you would like a free or paid account. Please check our pricing page for details on all available subscriptions.
If a captcha is presented during the registration process, please check here if you need help solving the captcha.
We have collected all the information you need when switching to...
... a paid Tuta account with your own domain
... a business account with Tuta
... a business account with Tuta as an NPO or a school
Welcome to the encrypted side!
Contact synchronization can be activated from Settings > Contacts > Contacts synchronization.
When you activate contact synchronization, your Tuta contacts will be synced with the contacts app you have on your phone. The Tuta app will then:
- create a contacts list for the Tuta contacts on iOS
- create a contacts account for them on Android
Updating your contacts in the Tuta app will update them in the phone's app and vice versa.
Keep in mind:
- If you make any changes to the contact using the phone's default app while Tuta is running in the background, the changes will only be synced upon your next login.
- If you update a Tuta contact on a different device, like the web browser, the Tuta app will use the version of that contact which is on your phone and overwrite any updates.
- Activating contact synchronization will not automatically import your phone's contacts to your Tuta account. If you would like to do that, please see How can I import contacts?
There are multiple ways to import contacts to your Tuta account.
- Option 1: Go to Contacts in your Tuta account and click on the button with the three dots next to "All contacts"
- Option 2: If you receive an email with an attached contact (vCard file), you can click on it to import it directly within the app. You will see a preview of all contacts included in this vCard file before importing them.
- Option 3: If you want to import existing contacts from your phone:
- Go to Settings > Contacts and click on the import button.
- You will then see a preview of the different contact lists you have on your phone. Select the ones you would like to import.
- Once done, you will again see a combined preview of all contacts to be imported.
- If contacts synchronization is activated on your Tuta account, then the imported phone contacts will also be added to the list of contacts (called account on Android) created by the Tuta app on the phone. See Contacts synchronization
If you can't log in to your account you might be in one of these situations:
- You have made a typo in your email address or password:
- Please double check your address and make sure that you have typed the full address and the correct domain name (for example youraddress@tutanota.com).
- Make sure that the Caps Lock key is not active.
- You forgot your password or lost your second authentication factor (2FA): Please read How do I reset my password or second factor?
- The code from your authenticator App (TOTP) is incorrect: These codes are time-dependent. Please make sure that both Tuta and the authenticator App have the correct time and time zone settings. Some browsers or browser extensions block access to the system's time zone.
- Your recovery code is not accepted or is wrong: Please double check whether you are using the recovery key correctly. See How do I use the recovery code?
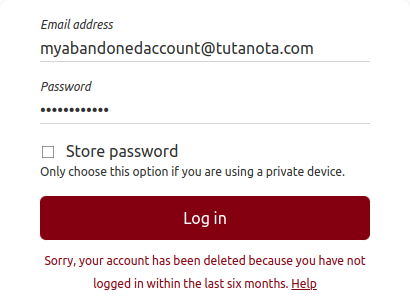
- Your account might have been deleted due to inactivity: In this case, you should see a corresponding message below the login form. Free accounts are deleted if you do not log in for a period longer than six months. We do not recycle Tuta addresses which means that the address is blocked for new registrations. You can still re-use the deleted address with a paid account, but only if you have the correct credentials for the deleted account. Please see How do I reactivate an account deleted due to inactivity?
- Your account was suddenly suspended due to another reason: Some accounts are disabled due to a violation of our Terms of Service or due to our spam detection. If you think that we have made a mistake, please contact us in English or German. Please include the email address of your suspended Tuta account and send us the error message you see below the login form.
Our secure password reset feature allows only you to reset your password. We have no influence on this process. You can read more about this here.
When you sign up for Tuta, you create an email account. This account initially has one user which is also an administrator. Free accounts only have one user. If you upgrade to a paid subscription, you can add users to your account. You manage the users (deactivate a user, change password) within your Tuta account with your administrator user. You may also allow multiple users to be administrators.

In the diagram, the '1' at the arrows means there is one item assigned. A user has one mailbox with one main email address, one (or more) calendar(s), and one address book. The '*' means multiple items may be assigned, e.g. an account has one or more users, a user may have multiple calendars and a mailbox has one main email address and may have multiple email aliases (paid feature) on top.
To learn how to set up a user or create an alias, watch this YouTube tutorial.
Yes, Tuta offers secure business email accounts with lots of whitelabel customizations. You can place the login for your employees directly on your website with a whitelabel domain. Learn here how to use Tuta in your organization or company with your custom email domain.
Here's a list of all whitelabel customizations for business use. Here are instructions on how to whitelabel Tuta for your business.
Yes, an encrypted calendar is integrated into the Tuta mail client.
Please check that the time zones of your devices are in sync, including daylight saving time.
If you are using Firefox/Tor Browser with resistFingerprinting option in about:config, this automatically resets the browser time zone to UTC, which then leads to sync issues.
Yes, Tuta will include a whole set of collaboration options such as working together on task lists and documents in the future. You can already book this collaboration tool. Right now it is called 'sharing feature' as you can now share your encrypted calendars as well as email templates with other paid accounts. This is the first step, more collaboration options will be added in the future.
Watch this YouTube tutorial on how to share a calendar in Tuta.
Yes, you can customize the logo and colors in Tuta when you book whitelabel.
The date format for your mailbox as well as your calendar is picked either from your language settings in Tuta or from your system/browser settings. If you pick 'English' under 'Settings' -> 'Appearance', the American date format is displayed. If you pick 'Automatic' under languages, the date format of your browser/system is displayed. If you pick any other language, e.g. German, the date format of this language, e.g. German, is displayed.
Yes, right after registration of a business account you will find a data processing agreement directly in Tuta under Settings -> Subscription.
Yes, Tuta as an encrypted email service is perfectly suited for any business that would like to use a GDPR-compliant email service.
Yes, Tuta is a green email service that relies exclusively on renewable energy for all email systems.
The Tuta clients use REST services but there is no public documentation for that API or for a library, yet. Keep in mind that when user data is stored in or read from Tuta, it has to be encrypted/decrypted on the client. You may of course dig into the open source code of Tuta and integrate it with your product, but at this time we can not provide any support for this. We will add a public API documentation in the future.
Yes, all Tuta clients are published as open source under GPLv3. Check out our GitHub repository. We welcome you to review the code, to give us feedback, or to contribute!
Your friends deserve email security, too!
Invite your friends to Tuta and you both win freebies! If they subscribe to Tuta for one year, you will get credits for 25% of all payments they make within the first month, and they will get one additional free month (13 months instead of 12). Just go to Admin Settings -> Refer a friend and you'll find your personal referral link to share. There is no limit on how many new customers an existing customer can refer.
Please note
Credits received via our referral program will be used for your invoices within Tuta. We will never pay out the referral credits nor do we allow transferring those credits to another customer.
The Tuta referral program is only meant for inviting people you know. We may terminate contracts with people who spam or bulk mail their referral links.
We donate the business version of Tuta to non-profit organizations (NPOs), schools, and open source projects. Please find details on how your organization can secure your emails for free or with a discount.
Yes, Tuta supports extensive customization options for business use such as custom colors, custom logo, custom text in the message to external recipients and more. To customize Tuta, you need to book the Whitelabel feature.
After six months without any login activity, free Tuta accounts including all contained data are permanently deleted and cannot be restored.
If you still have the correct credentials for the deleted account, you can re-use the same address(es) with a new paid account by adding them either as extra addresses or users.
Create a paid account (or use any paid Tuta account you already have as the target account). It needs to be a different email address than the deleted one.
Try to log in to the deleted account.
If you enter the correct password, you should see a message below the login form with a "Help" link. Click on "Help".
Enter the address of your new paid account in the "Target account address" field.
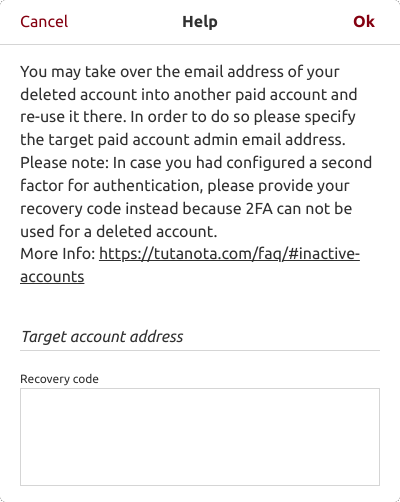
If the lost account had a second authentication factor (2FA) enabled, enter the Recovery Code. Please make sure to check our guide on using the recovery code here. Otherwise you can leave this field empty.
Click OK.
Log in to your new account and add the old address(es) under Settings > Email > Email addresses.
If you encounter any issues with receiving emails to your old address, please make sure to wait up to an hour and try again. Otherwise, please read our guide "I have reactivated my deleted address but do not receive Emails."
Make sure that you have waited one hour before trying to receive emails to the reactivated address.
Make sure that you have added the address either as an extra email address or a user to your new account under Settings → Email → Email addresses or Settings → User management. If you are not sure, you can watch our short YouTube video on the difference between email aliases and users.
Unfortunately, some services put email addresses on a blacklist after receiving a bounced delivery report and do not send emails to them at all anymore. If you are trying to receive a password reset link or a login confirmation from an online service, your address might have been banned during the time when your account was inactive. In this case, we cannot do anything from our side. Please contact the service in question and have them check the status of your email address. This usually solves the issue.
The recovery code is a 64-character long string and consists of the characters a-f and 0-9 only. This means that there could be no confusion between similar looking letters and numbers like the letter "o" and the number zero "0" for example.
This string is separated into 16 ordered groups each consisting of 4 characters.
When entering the recovery code you have to include the spaces between every four characters and all letters must be entered in lower-case.
You can share a contact list with any Tuta user. Go to contacts and click the three dots next to your contact list's name. When sharing you can also specify one of three different access permissions to the list:
- Read
- Read and write
- Write and manage sharing
The recipient will receive a notification email and will be able to see and accept the invitation under the contact lists section in the contacts view.
Recipients of shared contact lists can change the display name of the list on their account.
Contact lists are lists of addresses that can be used in Tuta to easily and quickly include multiple recipients when sending emails, event invitations or even when sharing contacts.
The list can include existing contacts or other addresses and can be shared with other Tuta users.
Here you can read how to create and use contact lists or how to share contact lists.
Contact lists are available on all new paid plans. To create a contact list navigate to contacts and click on the plus button. On mobile devices, open the left side menu in order to see the contact lists section and the plus button.
An editor pop-up window will open where you can enter the name of the new contact list and optionally add entries below.
When you start typing an address you, will see suggestions from your existing contacts but you can also add addresses that are not yet in your address book.
You can add multiple addresses and click "Save" when done. If you later decide to rename or delete the list, simply click on the three dots button next to its name.
Once you have a list created, you can use it in any recipient field in Tuta. For example when sending an email or an event invitation. Just enter the name of the contact list in the address field.
Here you can read how to share contact lists.
Your recovery code can be viewed in your Tuta account, provided that you are logged in and know your password. Simply go to Settings > Login and click on the pencil icon next to Recovery code.
If you know your password but still cannot log in because of a lost second authentication factor, we can only help if you have one of our paid plans and have either your PayPal or credit card stored on your account. In this case please contact us in English or German. Unfortunately we cannot provide any help in the case of free Tuta accounts because we have no way of verifying your ownership of the account.
If you have lost your password, then there is unfortunately nothing we can do to reset it for you. If we are able to verify you with the payment data, we can allow you to merge the lost address with a new paid account. All data stored in the previous account will be lost.
You can switch the subscription in Tuta by upgrading or downgrading.
We plan to add Bitcoin as a payment method to Tuta in the future. You can already buy Tuta gift cards with the cryptocurrencies Monero or Bitcoin or with cash via our partner Proxystore.
To redeem a gift card from Proxystore, please follow the instructions in Proxystore right after ordering the gift card. You will get a gift card link. When you use the link, you need to choose 'Use existing account' or create a new account, depending on where you want to apply the credit to. Once you have added the gift card, you can check the credit on your account under Settings -> Payment. When upgrading your account, you can now choose 'Account balance' so that no payment details need to be linked to your Tuta account.
When you buy a gift card (by clicking on the present symbol to the left), a popup will appear with some buttons that will give you the option to a) send an email containing the gift card link, b) copy the link to the clipboard, or c) print off a graphic containing a QR code. The popup can also be viewed later under Settings -> Subscription -> Gift cards.
The person who wants to redeem the Tuta gift card can then either click the link or scan the QR code, and they will be taken to a page where they can redeem it by following the steps provided (select 'Use existing account' or create Tuta account, then redeem).
To redeem the gift card on your own account, simply use the link to login with your account. Then the credit of the gift card will be applied to your account automatically. You can check your credit under Settings -> Payment.
The terms and conditions can be found here.
When booking a paid subscription in Tuta, you can pay via Credit Card (Visa, Mastercard, American Express), via PayPal, or via bank transfer. Payment via bank transfer is only available for business customers in the EU. If you would like to pay your personal plan via bank transfer, please contact our sales team.
If you have problems paying for your Tuta subscription, please contact our sales team.
Yes, you can buy gift cards and add them to your own account. Once the credit is added to your account, it does not expire. It will be used for future invoices. This gives you the option to top up your account whenever it is convenient for you. You can check your credit under 'Settings' -> 'Payment'.
You can secure the stored app login with a pin, pattern or biometrics (fingerprint, Face ID, etc.). Please go to Settings -> Login -> Unlock method to activate this.
This option will only show after you have stored your login credentials in the Tuta app. Upon login tick the checkbox 'Store password' to store your login credentials.
Tuta uses a password strength indicator that takes several aspects of a password into consideration to make sure your chosen password is a perfect match for your secure email account. You can find additional tips on how to choose a strong password here.
Tuta has no limitations in regard to the password length or used characters; all unicode characters are respected.
If you click on 'Logout', you log out. Please note: If you have previously saved the password, you are now logged out, but the password is still saved for automatic login. To 'unsave' the password, please log out. The login screen appears, click on 'More' and 'Delete credentials'.
A secure password is one that is random enough that it cannot be guessed in a feasible amount of time. But random strings of alphanumeric characters are hard to remember. That's why we have implemented a passphrase generator that finds a good balance between security and memorability. The generator chooses six easy words from a huge curated list and outputs a passphrase that is secure as well as easy to type and remember. Here are more tips on how to create and remember a strong password.
Your password is salted and hashed with Argon2 on your device before being transmitted to Tuta. Argon2 is the most reliable method because brute-force attacks need much more time in comparison to conventional methods such as MD5 or SHA. With this method, we guarantee an integrated confidentiality and we allow you to access and decrypt your emails from desktops and mobile devices instantly.
No. When a password is used for authentication (login), it is not necessary that it is known to the server you want to authenticate with. The server only needs a fingerprint (hash) of your password. With Tuta, your hash for authentication is calculated by your browser and only the hash is being sent. Your password never travels the Internet in plain text and it is never seen by our server. As hashes are non-invertible, the server is unable to reconstruct your password from the hash. The server is not able to decrypt your message, but it is still able to log you in.
Recommended for further reading: Learn how Tuta automates the encryption process while leaving you in full control of your encrypted data.,
If you think your password was disclosed to someone else but you can still log into your account, please do the following:
- Change your password in 'Settings' -> 'Login' -> 'Password'.
- Update your recovery code in 'Settings' -> 'Login' -> 'Recovery code'.
If the attacker had been logged in as well, changing the password automatically logs them out.
We encourage you to always use 2FA with your accounts as it makes it close to impossible for an attacker to log into your account.
If you can not log into your account anymore, please check this FAQ.
For email encryption between users, Tuta uses a standardized, hybrid method consisting of a symmetrical and an asymmetrical algorithm. Tuta uses AES with a length of 256 bit and RSA with 2048 bit or a combination of ECDH (x25519) and Kyber-1024 (for quantum-safe accounts). Emails to external recipients are encrypted symmetrically with AES 256 bit.
By default, we do not log IP addresses when you log in or when you send an email. The IP addresses of sent and received emails are stripped so that your location remains unknown.
We only log IP addresses of individual accounts in case of serious criminal acts such as murder, child pornography, robbery, bomb threats and blackmail after being served a valid court order by a German judge. You can find details on this as well as on German data protection rights on our blog.
Learn on our blog how Tuta fights illegal mass surveillance by providing an anonymous email service. Upon registration you do not need to provide any personal data (e.g. no phone number required). We will also make it possible to pay for Tuta with Bitcoin.
Tuta automatically encrypts all emails stored in your mailbox. Emails between Tuta users are automatically encrypted end-to-end, and emails to external users can be secured with the help of a password. Here we explain the differences between a confidential (end-to-end encrypted) and a non-confidential email.
Independent of the end-to-end encryption, the transport between the client and Tuta servers is secured with TLS to maximize security.
Watch our YouTube email encryption guide for Tuta - the quickest email encryption guide you can get!
A deleted email address (also if it is an alias) will not be recycled for security reasons. There must be no possibility that someone else is able to register your previously used email address, and then, by accident, receive a confidential email that was meant for you.
Free of charge accounts are deleted after an inactive period of six months. A regular login is necessary to prevent automatic deletion. We delete such accounts for security reasons and also to allow us to offer free of charge Tuta accounts at all. However, the email addresses of such deleted accounts may be taken over into another paid account and re-used as email aliases or additional user addresses if you still have the valid login credentials.
To re-use the email address of the inactive account
- You need to create a paid email account (or use any paid Tuta account you already have as the target account).
- Login to your lost account.

- Click on 'Help' as you can see in the screenshot above.

- Enter the 'Target account address' (and - if you enabled two-factor authentication - the recovery code of the lost address).
Then you can add the lost address(es) as an alias (or user) to the target email account. We call it merging of addresses.
Your private and your public keys are generated locally within your browser upon registration. Your private key is encrypted with your password. This way your login password receives the status of the private key. The key is encrypted so strongly that only you can use the key for encrypting and decrypting data. This is why a strong password is essential. An automatic password check on the client makes sure that you use a strong password. Your password is never transmitted to the server in plain text. It is salted and then hashed with Argon2 locally on your device so that neither the server nor we have access to your password. With this innovative design you can access your encrypted inbox from any device (desktop, mobile) easily.
Tuta does not load pictures automatically when you open an email. When you load external images manually, please note that
- someone knows that you read the email.
- someone may add cookies to your browser (if your browser is not configured to reject them).
- someone may track your location with your IP address.
- someone may track the parameters of your device.
Here we explain how to display external images. Please read here how we make sure that you can use Tuta as an anonymous email service.
We require all messages to be authenticated. Without authentication, the email could be coming from anyone or could be modified so you should always treat such emails with scrutiny. If you see a message where the authentication has failed (red warning banner), you should be especially careful as it means that this email was likely faked.
Phishing is a name or type of online scam in which criminals try to look like a legitimate sender in order to get your data such as credentials or credit card data. Phishers use very sophisticated psychological techniques and develop very realistic copies of real websites and emails.
If you see a phishing banner, it means that some parts of this email match our phishing signatures after other users reported similar emails as phishing. Please be extremely careful with such messages. Usually, phishing emails contain a special link to the website which looks real but it actually is not. If you think that the email is legitimate and you opened the link, please make sure to check the full website URL: Check that you see all of it, sometimes only one part or one character may be swapped. Here is more information on how to prevent email phishing attacks.
You can mark an email as not phishing so you will not see the warning message anymore for this email.
We never send you emails with links where you need to type in your password. We encourage you to always protect your login credentials with 2FA as this makes it close to impossible for an attacker to log into your account.
If you've already fallen for a phishing attack, please check this FAQ.
The Tuta servers are located in secure and ISO27001 certified data centers in Germany. All saved data are subject to the strict German privacy protection laws. Independent of that all data is end-to-end encrypted and cannot be read by the Tutao GmbH as the provider or by any third party.
Yes. You can view and remotely close active sessions under Settings -> Login.
Check our How-to to learn how to enable storing of closed sessions to monitor whether someone else has access to your account. To guarantee the users' privacy, we have implemented the feature as follows:
- The IP address is stored encrypted, and only the user can decrypt this information. No one else - not even we at Tuta - can access this information.
- IP addresses are only stored for one week and then automatically deleted.
Tuta encrypts all data stored in your mailbox (contacts, emails, email signature, inbox rules, invoice data, payment method, certificate, and private keys of your own domains). When sending an email, Tuta encrypts the subject, content, and attachments automatically.
You can find a detailed explanation about what is encrypted in Tuta on our security page.
We can read only the following metadata:
- sender email address
- recipient email address
- date of the email
We are looking into possibilities to hide the metadata in the future as well.
Thank you for taking the time to report a vulnerability. If you have found any security issues, please send us an email in either English or German with a detailed report in order for us to fix them.
We at Tuta take utmost care to secure your mailbox to the maximum. The Tuta code is open source and published on Github, and we invite all security experts to review it.
Yes, you can always access the emails sent via Tuta through the link from your latest notification email. Old notification links from the same sender are de-activated for security reasons. Your exchanged password, however, stays unchanged as long as the sender does not change it. If you have saved the password upon accessing your confidential emails in your browser, you do not have to re-enter it.
Email aliases are additional email addresses that you can use with the same mailbox without having to switch accounts. Additional email addresses are included in all paid plans of Tuta. If you upgrade to any of our paid plans, you can add alias email addresses.
Find out more about Tuta aliases in our How-to (create an alias, change default sender, etc.). Learn here what the purpose of an email alias address compared to a user is and how aliases can increase your security.
Yes, email addresses are automatically added to your encrypted Tuta address book when sending an email unless you deactivate this feature. You'll find details here.
Yes, any paid subscription of Tuta comes with custom email domain support and unlimited email addresses for custom domains. Multiple domain support is also available in Tuta. Please check our pricing page for details.
Please refer to our how-to to learn how to add your own email domains to your Tuta account and how to make sure that your records (MX, SPF, TXT, DKIM, DMARC, CNAME) are set up correctly in your DNS as well as how to activate/deactivate catch-all and more.
In addition, you can watch this YouTube tutorial to learn how to set up your own domain in Tuta.
Yes. Before logging in, click on 'More' and 'Switch color theme' to switch to the dark theme. This works in all Tuta clients (web, desktop, apps). Alternatively, you can go to 'Settings' -> 'Appearance' to switch to the dark theme. To add a custom theme, you need to book the Unlimited business plan.
You can download the Tuta desktop clients (Windows, Linux, Mac OS) on our homepage.
Yes, Tuta uses different variables to calculate email limits for individual accounts. This is necessary to protect our free and anonymous email service from spammers who try to abuse Tuta. If spammers were able to abuse Tuta, it would harm all Tuta users - ie Tuta domains could end up on email spam lists, which we have to prevent under all circumstances.
If you receive the following message in your Tuta account "It looks like you exceeded the number of allowed emails. Please try again later.", the anti-spam protection method has stopped your account temporarily from sending new emails. Please wait a day or two to send new emails again.
If you need to send more emails immediately, please upgrade to any of our paid plans as limits for paying users are much higher. Simply click on 'Plan' in your side menu bar of Tuta.
Please note that Tuta is not meant for sending out mass mailings such as newsletters. Please read our Terms & Conditions for details.
Yes, with a paid subscription you can set up email notifications to any email address under 'Settings' - 'Email' - 'Notifications'. You will be informed about new emails once until you log in. Only if you have logged in to view this email, Tuta will send another notification to keep notification emails to a minimum.
As a Free user, you can receive push notifications in the browser, the Android & iOS app as well as the desktop clients.
You can request and discuss new features with us and other users in our Reddit community. You can check whether someone has already requested this feature and whether we have already added it to our Roadmap.
No, this is not possible for security reasons. Tuta does not support the use of third-party email clients or the protocols IMAP/POP3/SMTP as we cannot guarantee end-to-end encryption of your data. Instead, Tuta offers email desktop clients for Linux, macOS and Windows as well as a web client and apps for Android and iOS. We aim to provide all required functionalities with our own apps, for instance, offline access to your encrypted data is possible with our apps.
Emails: You can export/download individual emails or batch-export emails by using multi-select. Email import is not yet possible. We plan to support email import as well as an even easier export function with our new secure desktop clients.
Contacts: You can import and export contacts via vCard.
Calendars: You can import and export calendars via .ics. Login with a browser and click on the three-dot button next to the calendar you wish to import data to or you wish to export.
Yes, Tuta supports an unlimited number of inbox rules / filters for paid accounts. Check our how-to to see how to set up inbox rules.
The language in Tuta is taken automatically from your browser or system settings. Please change the language there. Alternatively, you can go to 'Settings' -> 'Appearance' to switch the displayed language for Tuta.
We also invite you to join our translation project to improve Tuta in your native language!
Yes, you can add existing email addresses (e.g. Alice2, Alice3) as aliases or users to a paid account (Alice1):
- Delete the email accounts (e.g. Alice2, Alice3)
- Upon deletion, it is important to enter the 'Target account address' (Alice1).
- Then login to the stated target email account (Alice 1). Go to Settings → Email → Email aliases. Click on 'SHOW EMAIL ALIASES', click on the plus symbol, and add the deleted email address(es) here. Alternatively, you can add the address(es) as user(s) under Settings → User management by clicking on 'Add user'.
Please note: You are only transferring the email addresses. Emails and contacts stored in the deleted accounts (Alice2, Alice3) are being deleted. Please export important emails before deleting the accounts.
In the mobile app, you can currently only login with one user. To switch to another user, you must log out and log in again. You can login with multiple users in the browser by opening several tabs or windows. In the desktop clients, you can also open several windows to login with multiple users.
Please check the app settings on your phone. As we do not use Google's push notifications service, battery optimization must be disabled for Tuta to receive push notifications instantly.
This is necessary to offer you an open source email service free from any links to Google.
Yes, the Tuta mobile apps for iOS and Android as well as the Tuta desktop clients can store a local copy of your mailbox.
To activate local storage of data, please store your password within the client. By default, all contacts, calendars, and all emails sent and received within the last 30 days are then stored locally.
With all of Tuta's paid subscriptions you can increase the timeframe for which emails should be stored under Settings -> Email -> Local data. Please note that the emails must be loaded once to create the local copy.
Current encryption standards like PGP and S/MIME have several issues that we plan to address with Tuta. These standards do not support forward secrecy and are not resistant to attacks from quantum computers.
In addition, it is important to us that the subject line in emails is also encrypted. That's why we have developed a solution that is also based on recognized algorithms (RSA 2048 and AES 256) and that automatically encrypts the subject, the content and the attachments. We have replaced RSA with ECDH (x25519) Kyber-1024 to achieve quantum-resistant encryption.
In the future, we plan to support forward secrecy. You can find more information on why Tuta does not use PGP here.
We also see the importance that Tuta needs to be interoperable with other encryption solutions. We will develop an API so that Tuta users can communicate with users of other secure services confidentially in the future.
No, Tuta does not support plus addressing (xyz+username@tutanota.com) for Tuta domains. If you want to register with different plus addresses at different sites, you can upgrade to a plan that supports alias email addresses (limited to the number of aliases you book). Alternatively, you can use a custom email domain with catch-all to create an unlimited number of plus addresses for incoming emails.
Yes, Tuta comes with full-text search of your encrypted mailbox. In the free version, the search is limited to four weeks into the past due to heavy server load caused by the encrypted search feature. Learn here how you can improve your search results. The spam folder is excluded from the search.
Search is executed locally via an encrypted search index to guarantee the security and privacy of your data as well as your search queries. As the search index needs to be stored in your browser, it does not work in private mode/incognito mode. Read here how our innovative full-text search on encrypted data works.
Tuta desktop app uses a system keychain to be able to encrypt sensitive details such as credentials and alarms. On Linux there must be an app installed that provides secret storage (org.freedesktop.secrets interface). This is usually set up together with the rest of the desktop environment but sometimes it requires manual setup. Installing GNOME Seahorse and configuring keychain there should be sufficient. KeePassXC is another provider which can be used but it must be additionally configured.
The Settings are in the navigation menu to the left.
Yes, you can change the signature in Settings -> Email. Every account can change their signature. To support our free and secure email service, please leave the link to our homepage in your signature.
Yes, Tuta uses a spam filter to keep your mailbox free from spam. We are improving this filter continuously. Should you receive spam emails in your inbox, you can also configure your own spam rules here to deny or allow certain email addresses or domains. If a sender is blocked (rejected) by the spam filter, you can change the settings to allow the sender for your account.
In paid accounts, only admins can create spam rules that are being applied across all users.
Yes, Tuta supports HTML editing options (embed images, add lists, bold, italics, underline, monospace, add hyperlinks, align the text left, center, right, justified, change text size, remove all formatting). These are explained in our how-to along with lots of information on email handling.
Yes, all emails in Trash or Spam are automatically deleted 30 days after the emails were moved to these folders. You can also manually empty these folders with one click. Please note: Emails deleted from Trash or Spam folders are physically deleted and can't be restored.
You can download the Tuta app from the following stores:
In addition to that, you can also directly download and install the APK for Android. Keep in mind that you will not get updates automatically if you install the app manually instead of using an app store. You can add our blog to your RSS-reader with this link to get notified about updates: RSS-Feed
Web: The web version of Tuta is automatically updated whenever you reload the page. If an update is released while you're using Tuta, you will see a pop-up notification prompting you to update. All you have to do is click on "Refresh" to update. If Tuta does not update in your browser, you can trigger a manual update by loading Tuta in private/incognito mode of your browser.
Desktop: The desktop app automatically checks for updates by default. Whenever it finds an update, it is downloaded in the background and you receive a push notification. Under Settings -> Desktop, you can activate/deactivate automatic updates or manually check for updates
iOS/iPadOS: Please use the App Store to check for Tuta updates.
Android: If you're using the Google Play store, please check there for updates.
F-Droid: Please make sure that you open F-Droid and navigate to the updates page. Swipe down anywhere on the screen to sync your repositories. Once done, you will be able to see any available updates for Tuta.
Please note: Our system sends update notifications via email whenever we detect an active session from an outdated client. Please go to Settings -> Login and close any unused sessions under Active Sessions.
Download: You can download the Tuta clients here.
If you add another user to your account (family member, partner, team member, etc.), you get the following benefits:
- Share alias packages,
- Share storage packages,
- Use the same admin settings such as Spam rules and custom domains,
- Reset passwords or second login factors for each other (admin status required).
Here are more details on user management. If you do not need these sharing options, you can also upgrade accounts individually. Please check our pricing calculator for details.
Furthermore, we have recently added a sharing feature for the encrypted calendar which we will extend in the future. Sharing of entire calendars only works with other paid Tuta accounts.
WebView is a system app on Android devices which allows us to display web content inside the Tuta app. Newer versions let us use newer technologies to make the app smaller, faster, more beautiful, and more reliable. If you experiencing issues or bugs with the Android app, updating WebView has a good chance to help.
Here are instructions on how to update WebView on your phone.
Some accounts are automatically marked for approval upon sign-up to prevent abuse. This often affects IPs from VPN services or Tor as spammers try to bypass our anti-spam protection method by abusing these services. Please read here why the 48-hour wait is necessary to protect your privacy to the maximum with a truly anonymous email service.
During these 48 hours, emails cannot be sent or received. Please do not share your new email address before the blocking has been lifted automatically.
Tuta uses its own Captcha so that we do not have to depend on using Google Captcha. This enables us to offer an open source email service without any links to Google.
The Tuta Captcha shows a clock. You need to enter the displayed time with four numerals, including the colon in the middle. If the displayed time is 8.30 for example, you have to enter 08:30 or 20:30 exactly.
Please check whether the sender was blocked by following this instruction.
Sometimes newly created email addresses are put on hold for 48 hours to prevent abuse. It is important that you do not share your email address until this block is lifted automatically. If you do use the email address to register elsewhere or sign up for newsletters before the block is lifted, this service will send you a confirmation email, which will bounce with a temporary error. This might lead to problems registering with this service, even in the future.
The same issue sometimes affects users whose Tuta email address has been blocked, for instance due to inactivity. Even after you reactivate your Tuta email address, this might lead to problems receiving emails from online services because they stopped sending to your address due to bounces. In that case, please contact the service in question and ask them to start sending to your address again.
Most websites and online services let you register with your chosen Tuta email address just fine. Unfortunately, we have received reports from users that some websites block Tuta email addresses for registrations. Please check these options to resolve this situation.
If you would like to inform us about abusive usage of one of our domains (tutanota.com, tutanota.de, tutamail.com, tuta.io, keemail.me, tuta.com), please contact us at abuse@tutao.de. Please forward the abusive message to us if appropriate.
If you are a Tuta user and have received a phishing email, you can report this email by clicking on the three-dot button to the right and then clicking on 'Report phishing'. Here are more details.
If you would like to report abusive usage originating from another provider's email address, you can find contact addresses at abuse.net.
Yes, you can downgrade back to free anytime. Before this, you need to disable all extra bookings. You can keep your main Tuta email address as a free account.
Check here to see how you can upgrade or downgrade.
Yes, the Tuta Transparency Report is updated every six months. You can check it here. It also includes a Warrant Canary.
You may opt in to share your Tuta usage data with us to help us test new features and find issues with existing functionality. This consent is optional and may be revoked at any time in settings.
We use usage tests only to improve Tuta. To evaluate usage tests, we will generate and store a random identifier on your device that is shared across all logged-in accounts. Since your usage data is about your interactions with the app, we do not collect any personally identifiable information.
Your anonymized usage data may be used for research purposes, but apart from this, we do not share your usage data with third parties.
Usage data usually takes the form of one of the following:
- Sequences of interactions
- Time required for certain actions
- Points at which a certain interaction is aborted
We recommend setting up 2FA because of its security benefits. Learn in our online security guide how 2FA helps you to keep your emails safe from hackers.
Registering your second factor
You can connect your second factor with Tuta in Settings -> Login. As admin you can setup second factors for your users in Settings -> User management.
Tuta currently supports the following second factor types:
- Security keys (U2F), e.g. Yubikey. U2F is supported in all Tuta clients.
- TOTP with an authenticator app such as FreeOTP+, andOTP, Authenticator, Authy etc. If setting up a second factor with TOTP fails, please make sure that the time is synced between your devices.
Second factors can be added by administrators and users, but only admins can remove assigned second factors.
Note: If you lose your second factor, you will no longer be able to login to your account. To prevent this, you can add multiple second factors. Additionally, please note down the recovery code shown to you when adding a second factor.
Authenticating with your second factor
During login you have to authenticate with one of your second factors. Alternatively, you may also accept that session from another logged in client. If your browser does not support the second factor you had registered, you can only accept the session from another client.
How to reset your second factor if you lose it
For resetting your second factor, you will need your personal recovery code and your password. You can view and also update your recovery code in Settings -> Login.
If you have lost your second factor, click on More -> Lost account access on the login page. There you will have to enter your recovery code as well as your password to delete all your second factors.
Email encryption is needed whenever you want to send a confidential email. That is whenever your email contains personal information that should not become public. The following examples show the differences between end-to-end encrypted, confidential emails and emails that are not being end-to-end encrypted in Tuta.
In this YouTube tutorial we demonstrate how you can send an encrypted email in seconds.
Alice is registered with Tuta, Bob may be registered with Tuta or an external recipient and Carol is not registered with Tuta. In any case, all emails (including attachments) are stored encrypted on the Tuta servers. Independent of the end-to-end encryption, the transport between the client and Tuta servers is secured with TLS to maximize security.
Sending and receiving end-to-end encrypted emails
The email is encrypted on Alice's client, stored encrypted on the server and can only be decrypted by Alice or Bob.

Sending non-confidential emails
The email is sent via SMTP to the recipient. Still, the sent email is encrypted for Alice on the server and then stored.

Receiving non-confidential emails
When the SMTP email is received by the Tuta server, it is encrypted for Alice and then stored on the server.

If you own one or more domain names that you want to use with Tuta, you can add these domains to your paid subscription of Tuta. The setup wizard for your custom email domain will guide you through the process in just four small steps. In each step, the wizard will explain, which configuration changes you have to make. If you don't have a Tuta account, you can register here.
The setup wizard for your custom email domain can be found in 'Settings' -> 'Global settings' -> 'Custom email domains' by clicking the '+' button.
Check out this YouTube tutorial to learn how to set up your own domain in Tuta.
In order to send and receive emails with your custom domain in Tuta, you need to configure the following types of DNS records in the settings of your domain name provider. Prior to configuring those DNS records, the wizard will allow you to create new users or email aliases for your custom domain in order to have a smart switch to receiving emails in Tuta.
- a TXT record to prove that you are the owner of the domain
- an MX record with any priority
- a TXT record for SPF
- CNAME records (_domainkey) for DKIM
- CNAME records for MTA-STS
- a TXT record (_dmarc) for DMARC is recommended
The exact values that these DNS records should point to will be shown to you in the setup wizard.
The MX record is necessary to relay emails for your domain to the Tuta servers. The SPF TXT record marks the Tuta server as a valid sender of emails from your domain. The _domainkey and _dmarc records make sure your emails are signed with DKIM and sender spoofing of your domain's email addresses can be detected automatically by the recipient mail servers. The MTA-STS records make sure that transport encryption and authentication are used between different mail servers.
Tuta will indicate if the DNS records are fine for all your domains or if there is something that has to be changed.
Please note that with some domain name providers, it may take up to a few hours before changes to your DNS records become visible for other mail servers. You can check your DNS settings here.

- Login to our mail client here.
- Please enter your full email address and password and click 'Log in'.
- If you tick 'Store password', your password will be stored in the browser for easier login. Only choose this option if you are using your own device.
- Click on 'More' to see more options. 'Sign up' to register a new account, 'Switch color theme' to switch to the dark theme (shown in the screenshot above), and 'Lost account access' to open a help article on how to recover your account.
- If you have saved your password, you will see two more options under 'More': 'Different account' to login with another Tuta email address and 'Delete credentials' to delete the password you have previously saved in the browser.

- Tuta supports lots of keyboard shortcuts. You can display all shortcuts available in any given section of Tuta by pressing F1 (fn+F1). You can also use HTML shortcuts to design your mails such as Ctrl+b, Ctrl+i, Ctrl+u. Watch our YouTube tutorial on shortcuts here.
- Show header info: You can show the email header of received emails by pressing H.
- Tuta strips headers from emails sent to protect your privacy.
- If the technical sender is different from the header info, Tuta warns you about this. The differing sender information could be a sign that this email is coming from a scammer.

In addition to the top menu - search field, Emails, Contacts, Calendar - there is a menu on the left side of your mailbox. These items are explained further down in the How-to.
- Click on 'Premium' to easily upgrade to a paid plan.
- Click on 'Invite' to open a pre-written email in Tuta, which you may use to invite your friends to join Tuta. Please do so! :)
- Click on 'Settings' to open the Settings menu.
- Click on 'Logout' to log out. Please note: If you have previously saved the password, you are now logged out, but the password is still saved in your browser. To 'unsave' the password, please log out. The login screen appears, click on 'More' and 'Delete credentials'.


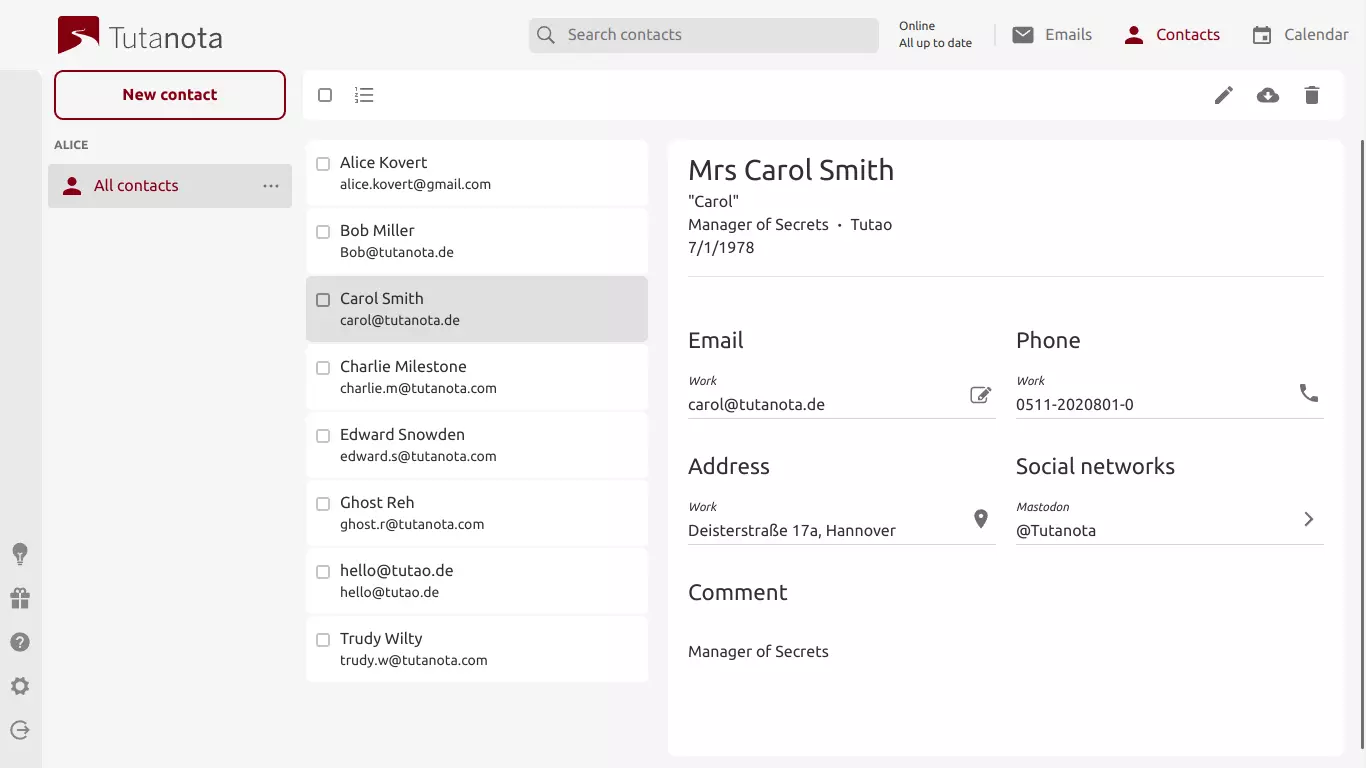
- Each time you send a mail to a new email address, this address is automatically saved to 'Contacts'. This can be changed here → 'Create contacts'.
- Select a contact and you will get the option to edit (pen symbol to the right) or delete (trash symbol to the right) this contact. You can also send an email to this contact by clicking on the mail button next to the contact's email address.
- You can add new contacts by clicking on 'New contact' in the top left corner. When you create a contact, you can enter all necessary information (see screenshot below).
- The three dot button next to 'All contacts' allows you to import or export contacts via vCard and to merge contacts automatically.
- You can also merge contacts manually: Press Ctrl while selecting two contacts that should be merged. At the top right two buttons appear: 'Delete' and 'Merge'. Click 'Merge' to merge the selected contacts.
- Contacts are sorted alphabetically according to their First Name.
- Your entire address book is encrypted, thus, no one can access your contact database stored in Tuta.

Create contact view.
- Register a paid Tuta account here. This will create your initial administrator user mailbox. Once you have added additional users to your account, you can mark all - or just some - as admins. Your administrator(s) can configure all general settings and manage users, e.g. reset their passwords. As we at Tuta can not reset passwords, we recommend having at least two admins and/or to note down the recovery code during the signup process. You have to choose one of the Tuta domains for your initial admin user email address. You can later add an alias of your custom email domain to this user.
- Add your custom email domain in "Settings" -> "Global settings" -> "Custom email domains". You have to set a DNS record for your custom email domain in order for us to verify that the domain is yours. You will find the exact instructions in Tuta when setting up your domain but you can also read about it here.
- Add users (i.e. mailboxes) for your domain in "Settings" -> "User Management". If you have a large number of users, you can import a CSV file containing the user name, email address, and password. This is useful to automatically create all users in one single step.
- Set the DNS records (MX, SPF, DKIM, DMARC) for your custom email domain in order to be able to send and receive emails with your custom domain in Tuta. If it does not work, you will see a list of missing or bad DNS records in "Settings" -> "Global settings" -> "Custom email domains".
- Provide the user passwords to the users, so they can log in to their mailboxes.
Please note that we do not support email import, yet. We plan to enable import in the coming months. For now, we recommend keeping your old mailboxes as a reference when moving to Tuta from another provider or storing all emails locally.
On our business site, there is a summary of all available features of Tuta's secure business emails.
When you create a new Tuta account, our secure password reset feature empowers only you to reset your account yourself. Please make sure that:
- You write your password down and keep it somewhere safe.
- You write down your recovery code to never lose access to your Tuta account.
In case you can't login to Tuta, please make sure that:
- You have entered your email address with the correct ending, e.g. ".de" or ".com".
- The caps lock key is disabled.
- The time on your TOTP device is synchronized correctly (only applies if second factor authentication with TOTP fails).
We do not know your password and can't modify your second factors. However, there are different ways on how to regain access to your mailbox in case of a lost password or a second factor.
Administrator is available
If you are a member of an organization or a business: Ask your administrator to reset your password. Each administrator can reset the passwords of other users and admins. If you want to make sure to never lose your paid account, it's best to have at least two administrators.
Recovery code is available
Your recovery code is your personal code for resetting your account. If you did write it down when you created your account, you can reset your password or second factor using your personal recovery code by clicking on More > Lost account access on the login page.
You can view and also update your recovery code in Settings > Login. You can also find more information on this secure reset feature on our blog.
With 2FA enabled, you will need 2 out of 3 to reset your Tuta account:
Click here to reset your password. You will need your second factor (if 2FA is enabled) and your recovery code.
Click here to reset your second factor. You will need your login password and the recovery code.
Please note: If you lose your password and your second factor, there is no option to reset your Tuta account with the recovery code.
To search your encrypted mailbox, simply click on the top search field or press F.
It is very important to know that you can search for multiple words at once, for instance, the sender's email address, keyword, and file ending. Such a search could look like this: alice@tutanota.de meeting notes pdf

When you press enter, Tuta takes you to a more detailed search mask. The free search feature goes back one month into the past.

The detailed search mask lets you specify the time frame which should be searched (one month for free users). The unlimited search feature also lets you filter your search, e.g. who sent the email, to whom did you send the email, was the search query contained in the subject or in the body, and what folder should be searched.
As all data in Tuta is encrypted, using our innovative search feature causes a lot of traffic. This is why unlimited search is only available to paying users. Learn here how you can benefit from extra features by upgrading.
Please note: You can only search emails and contacts, thus, the search field is not shown when you are browsing the 'Settings' of your mailbox.
To update WebView it is enough to install or update one of the following apps:
For most Android versions: Android System WebView
For Android N (7), Android O (8), Android P (9): Chrome
For some specific Android installations (e.g. custom Android ROMs, some LeEco devices) the procedure might be different or might not work. Please refer to your device or OS vendor for instructions.
Advanced: Changing WebView provider
If you do not want to use Google-provided WebView, it is possible to install some other app (like Chromium or another WebView build) which can be used instead. Please refer to these instructions. Please note that we can only support Chrome/Chromium based WebView.
When sending an encrypted email to an external recipient, you need to specify a password when composing the email.

Once set, the password will be automatically saved along with the contact in your Tuta address book, which makes your encrypted address book the password manager for your external contacts. Next time you write an email to that recipient, you simply specify the email address and Tuta automatically enters the password. The password needs to be exchanged via a second channel. If you would like to change the password, you can either do this within the contacts view or when composing a new email to this external recipient.
The external recipient
- receives a notification email with a link to Tuta (browser opens up),
- enters the exchanged password,
- can read the automatically decrypted email, reply confidentially, export all exchanged messages, and save them locally.
Note: The link within the notification email contains a salt which is needed for decryption along with the password. Thus, someone who wants to intercept your encrypted messages needs the exact link and the password. (An old link gets deactivated as soon as you send a new email to the same email address.)
Watch our YouTube tutorial on how to send an encrypted email to external recipients.

- You can use multi-select on desktop (press Shift or Ctrl while selecting and deselecting specific mails) and mobile (activated by a long press).
- You can move all selected mails with drag & drop to any folder.
- You can drag and drop all selected emails to your local file system by pressing ctrl or alt while dragging. In the desktop clients, you can decide whether to export emails as msg or eml files under 'Settings' -> 'Desktop' -> 'Email export file format'.
- You can click the symbols displayed to the right: 'Cancel', 'Move', 'Delete', or the three dots. When you click the three dots, you can choose one of the following options: 'Mark unread', 'Mark read', or 'Export'.
- In the Tuta app, you can swipe a mail left, then it goes to Trash. If you swipe a mail right, it goes to Archive.

When you select an email, these options show up at its top.
The top email menu has the following options:
- Arrow left = reply - Shortcut: Press R.
- Double arrow left = reply all - Shortcut: Press ⇧ + R.
- Arrow right = forward
- Folders symbol = Move this email to a folder. When you click this symbol, a folder list opens where you can choose a folder to move the email to. You can also move a mail with drag & drop in the browser.
- Delete symbol = The email is moved to Trash.
- Three dot symbol = You can mark the email unread or export it.
If you want to print an email as a pdf, you can use the browser function for printing.

- In an opened email, you can click the sender. A pop-up opens where you can show and edit this contact in your address book.
- You can also click on 'Add inbox rule' (part of all paid plans) or 'Add spam rule' so that future mails from this contact are automatically moved to a specific folder.

- With a paid subscription, you can also click 'Add inbox rule' to send all new emails from this sender to a particular folder. Find more details on 'Inbox rules' under the section 'Email'.
Sending of emails
Condensed email window.
- Click on 'New email' in the top left corner to compose a new email.
- When you enter an email address into the 'To'-field, Tuta shows you the preview of matching email addresses from your address book. You can hit 'Enter' to choose the first email address shown or you can keep on typing.
- Once you have entered an email address in the 'To'-field, the 'Confidential'-button appears in the 'Subject' line. Click on it to send this mail not end-to-end encrypted. You may also switch the default to encrypted/not-encrypted here in your Settings→ 'Default delivery'. Emails to other Tuta users are always end-to-end encrypted; there is no option to disable this.
- Below the recipient's email address of an encrypted mail, you enter the 'Password' for the recipient, which you need to share with your recipient via a different channel.
- Attach files by clicking on the file symbol in the subject line or by using drag & drop.
- Write your email like you are used to from other webmail services. When you click 'Send', Tuta automatically encrypts the subject, body, and attachments for you.

Enlarged email window.
- Click on 'Show' in the 'To' field to enlarge/reduce the options shown. After enlarging it, you can enter Cc- and Bcc-recipients.
- If you have added an alias in 'Settings', you can also change the email address you want to send from by clicking on the pen symbol next to the 'Sender' email address. You can change the default sender here in your Settings→ 'Default sender'. This makes your alias the default sender, the Tuta address will still remain the main account address (name in tab) which can't be changed.
- External recipients of an end-to-end encrypted email receive a notification mail from your Tuta email address. You can choose the language of this notification email by clicking on the pen symbol on the right (in this screenshot: English is chosen).

When writing an email you can use these text editing tools
Please use mouse-over in the web client to see what symbol represents what function. The Tuta text editing tools enable you to embed images, add lists (bullets and numbers), change texts to bold, italics, underline, monospace, add hyperlinks, align the text left, center, right and justified, change the text size, and remove all formatting from selected text.
Depending on the width of your browser Tuta displays the left Settings menu, your folder list, your mail list, and the selected mail.

- To add folders, please click the plus symbol in the left folder view. A pop-up opens where you can enter the folder name. The newly created folder will be sorted alphabetically under 'Your Folders'. You can add as many folders as you need.
- To edit this folder later, click on the folder. Then click the symbol with the three dots next to the folder. You can 'Rename' this folder, or 'Delete' it.
- Please note: If you delete a folder all mails are immediately physically deleted. Make sure to have selected the right folder before hitting 'Delete'.
- If you are in the 'Trash' or 'Spam' folder, you can click the 'empty folder' symbol next to the folder to completely empty this folder. When you click this symbol, all mails are physically deleted. Physical deletion means that these mails can never be restored, not by you, not by us. They are wiped from our servers.
- Spam folder: Tuta automatically puts suspected spam into this folder. If you delete a mail from this folder, it does not go to Trash, but it is physically deleted.

Spam detection in Tuta is multi staged. For incoming unencrypted SMTP emails, the received email is checked against DNS spam lists first. In the second stage, we filter emails by executing content checks and mark emails as spam or not. Emails that have been marked as spam will be moved to the spam folder of your mailbox. In the third stage, we filter spam on the base of user defined email sender lists. This list provides the possibility to classify email addresses as spam or not as spam. The check is active for all incoming emails and can be configured by the administrator. The rules are valid for all users.
As an administrator for a Tuta account you can configure the email address list here in Settings.
Within a received email, please click on 'Show more', then click on the From address to assign the email address, the domain, or the top level domain with one of the following spam rules:
- Not spam - Emails from this sender email address are always stored in the inbox.
- Always spam - Emails from this sender email address will always be stored in the spam folder.
- Discard - Emails from this sender email address will be silently discarded. The sender does not get any information about it.
The "No spam" rule has a higher priority than "Always spam" and "Discard" has the lowest priority.
You can set spam rules for sender addresses (highest priority), domains (lower priority), and top level domains (lowest priority). To add a spam rule for a domain, just enter the domain like xyz.com without putting an @ in front. This rule will also apply to emails sent from a subdomain. To add a spam rule for a top level domain, just put in com - for example - no dot is needed before this.
Rules for domains are restricted. You are not able to assign the rules "Always spam" and "Discard" to Tuta domains, neither to your custom domains.
You also have the option to allow all emails. To do this, create a spam rule and put in an asterisk * where you would usually put in the email address that the rule should apply to.

To insert a template into the mail editor, please login to Tuta in the browser or in one of the Tuta desktop clients:
- Type "#" and the shortcut you defined when creating the template.
- Hit tab.
- The template gets inserted into the mail editor automatically.
If you have created several language versions for this template, you can choose the correct one after hitting tab (step 2).
Alternatively, you can access your templates by typing ctrl+space, or from the editor toolbar. There you can search for the correct template and insert it.

Tuta blocks automatic image loading to protect your privacy. To load external images, please click on 'Show' above the mail body to load the image for now or on 'Always trust sender' to always load all images sent from this email address. Please note that you have to allow images from a trusted sender on all your devices at once. In the case that mail authentication fails or is non-existent, images will not be loaded even if the sender has been allow-listed. Inline images are displayed directly as no external content needs to be loaded.

How to receive blocked emails.
Go to 'Settings' -> 'Global Settings' -> 'Rejected email senders' to check whether any email to your account has been blocked due to the sender being listed on a spam list. You can click 'Refresh' to refresh the list in case you are waiting for a registration email. If a blocked email is shown here, you can allow the sender so that emails from this sender will reach your inbox in the future.


'Login' shows you several info items about your Tuta account.
- 'Login credentials': You can check your email address, your password, and your recovery code. When clicking on the pen symbol next to 'Password', you can change your current password to a new one. The pen symbol next to 'Recovery code' lets you view and update your recovery code. For this, you need to enter your password. As we can't reset your password, it is important that you keep your recovery code somewhere safe.
- 'Second factor authentication': Click the plus symbol to the right to add a second factor. Tuta supports U2F and TOTP for 2FA. Once added all second factors are displayed here. You can delete them by clicking the cross symbol next to each added key.
- Activate session handling to see who has accessed your Tuta account. This information is stored encrypted and automatically deleted after one week.
- 'Active sessions': This shows you the IP address currently being logged in to your account. We only store client and IP addresses encrypted so no one but yourself can access this information. Here you can remotely close sessions, for instance when you have lost your mobile phone and you are still logged in on your phone.
- 'Closed sessions': Click on 'Show' to see from where you have logged into your account recently. This lets you check whether someone else tried to access your Tuta account.

Here you can configure how you want to send your mails.
- 'Default sender': All mails you send are being sent with this email address. If you have aliases added to your account, you can change the default sender address by clicking on the pen symbol. You can also change the sender every time you are composing an email.
- 'Email signature': You can either use the 'Default' signature when sending mails or by clicking the pen symbol to define your personal signature or use no signature at all.
- 'Default delivery': Click the pen symbol to decide whether new mails should be sent end-to-end encrypted ('Confidential') or not end-to-end encrypted ('Not confidential') by default. You can always change this for individual mails when writing an email.
- 'Formatting': Click the pen symbol to decide whether all mails should be sent including HTML formatting or converted to plain text.
- 'Create contacts': Click the pen symbol to decide whether contacts should be created when sending mails ('Activated') or not ('Deactivated').
- 'Search mailbox': Click the pen symbol to decide whether the search feature for your encrypted mailbox should be 'Deactivated' or 'Activated'. Please note: Search in Tuta needs to be handled locally on your device as all data on our servers is encrypted. Thus, enabling search consumes memory on your device and might consume additional traffic.
- 'Report spam': You can choose between 'Always ask', 'Always report', or 'Never report'. Reported emails are transmitted to us in plain text, i.e. not encrypted end-to-end.
- 'Autoresponder': Here you can activate or deactivate your autoresponder. A personalized out-of-office notification can be entered upon activation.
- 'Conversation thread': You can decide to 'Show all emails together in thread' (conversation view) or to 'Show selected email only' (no conversation view).

- 'Email addresses': Click on 'Show' to add alias email addresses or activate/deactivate existing aliases. Click on the plus symbol to add aliases. A pop-up opens where you can type the alias you want to add. Click on the three-dot button to choose the domain for your alias. This can be any of the Tuta domains or of your own domains that you have added to your Tuta account. Before doing this, you need to upgrade to a paid subscription. Please note: Aliases with a Tuta domain can only be disabled, but not removed. Deactivated aliases must remain linked to your account in case you want to activate them again in the future. When you are using your own domain with Tuta, you can delete aliases with your own domain and create new ones.

'Inbox rules' (filter): Click on 'Show Inbox Rules' and then on the plus-button. A pop-up with three options opens: 'Field', 'Value' and 'Target folder'.
- Field: Click on the pen symbol to define what field should be used for the inbox rule 'Sender', 'To recipient', 'Cc recipient', 'Bcc recipient', 'Subject contains', or 'Header contains'.
- Value: You can enter text such as an email address, a domain name, or the required content of the subject or header.
- Target folder: Click the pen symbol to define what folder the specified mails should be moved to automatically upon hitting your inbox. Before being able to add inbox rules, you need to upgrade Tuta.
For inbox rules we support JavaScript regular expressions. You have to enclose the expression with slashes / like the literal definition of regular expressions. More information can be found here.
'Notifications': Click on 'Show' and the plus symbol. A pop-up opens where you can enter an email address that should be notified once a new mail arrives in your Tuta mailbox.
Push notifications
- Tuta allows you to receive push notifications via other email addresses and via its Android and iOS apps. Push will be sent to your phone even when you are not logged in.
- To manage what email addresses and mobile devices should (or should no longer) receive push notifications, click here→ 'Notifications'.
- You can also allow your browser to send push notifications for Tuta in your browser settings, but only when you are logged in.

Please login to Tuta in the browser or in one of the Tuta desktop clients. In Settings -> My Templates you can create templates to answer repetitive requests faster. Click on 'New template' to create a new template.

For your template, enter a Title, a Shortcut, select the language (here: English), and the content. When using templates, you will need the shortcut to find the correct template. The content will be added to the mail editor automatically.
Here we explain how to add templates to an email or you can watch our YouTube tutorial on email templates.
- The global admin can create a local admin group to add as well as manage administrators of users and contact forms. Please refer to 'Create a local admin group' for details.
- The user who creates another user or contact form becomes the administrator of the created entity. More precisely, the admin group in which the user is a member will become the admin of the entity. If the user is a global admin, then the entity is administrated by the global admins. If the user is a local admin (i.e. member of a local admin group), then that local admin group becomes the admin.
- The global admin can change the administrator of a user by selecting a local admin group under 'Administrated by'.
- Local administrators only see those users and contact forms that they administrate.
- Even if an entity is administrated by a local admin group, the global admins can still administrate the entity.
- A contact form is always administrated by the administrator of its receiving mailbox. So if a global admin changes the receiving mailbox of a contact form, the admin of this user mailbox becomes the administrator of the contact form.
- 'Spam rules': Click on 'Show' to show all defined spam rules. Click the plus symbol to add rules. You have the option between 'No spam', 'Always spam', or 'Discard' depending on a specified email address or domain name. Please find more details on the configuration of spam lists in our FAQ.
- 'Custom email domains': Click on 'Show' to show all added custom domains. Click the plus symbol to add your custom domains. You can add as many domains as you need. Details on using custom email domains with Tuta can be found in our FAQ. Next to each custom email domain is a three dot symbol. When you click it, you can 'Set a catch all mailbox' or 'Delete' this domain. If you select 'Set a catch all mailbox', you have to choose to which email address (=which inbox) catch-all mails should go to. This is usually your main admin, but can be any user that you have added to your account. All emails that are being sent to your own domain that do not match any existing email address will be delivered to the catch-all mailbox.
- 'Security': By Clicking the pen symbol, you can force your users to change their password after an administrator has reset the password. Please note: Only administrators of paid accounts can reset the passwords of their own users, e.g. all users of a custom domain. Tuta as the mail service provider cannot reset your passwords for security reasons.
- 'Audit log': This log is only visible to admins of paid Tuta accounts. It contains important administrative actions, e.g. if you have added a second factor to one of your user accounts, or if you have changed the password of one of your user accounts.

- Click 'Add user' at the top of the user list. A pop-up opens where you can enter the 'Name' of the user, his 'Email address' and a 'New password' for logging in.
- Please note: Each user gets their own mailbox and login so each user costs extra. If you simply want to add another email address, you can also add the address as an alias email address which is already included in all paid subscriptions.

Go to Settings -> Payment to view and update your payment details.
- 'Invoice data': Click on the pen symbol to update your address in case you are paying by invoice.
- 'Payment method': Click on the pen symbol to choose another payment method. You can pay by Credit card or PayPal. Business users can also choose 'Purchase on account'.

- Click on 'Upgrade' to upgrade your free Tuta account to Premium, Teams or Pro. Look at the screenshot below to view the upgrading process.
Once upgraded you can add 'Extensions':
- Please note: When you want to downgrade back to the free version, you have to disable all these extensions as they are only available to paying Tuta users. This means, for example, that all your aliases must be deactivated. They will still be linked to your account so that you can reactivate them when you upgrade again at a later stage.
- 'User accounts': You can manage your current user by clicking on the pen symbol or you can add more users to your account by clicking on the plus symbol.
- 'Storage capacity': Click on the pen symbol to switch to another storage package in your account.
- 'Email aliases': Click on the pen symbol to switch to another alias package.
- 'Groups': Click on the plus symbol to add a local admin. Refer to 'Local admin' to learn how to set up a group.
- 'Whitelabel': Click on the pen symbol to add the whitelabel feature to your account. This allows you to customize your account: login via your website, add custom logos & colors.
- 'Sharing feature': Click on the pen symbol to book the sharing feature, which lets you share data (e.g. the calendar) with other Tuta users.
- 'Business feature': Click on the pen symbol to book the Business feature, which lets you send out of office notifications, send calendar invites and add multiple domains to your account.
- 'Contact forms': After adding whitelabel, you can also add a contact form to your website. This allows visitors of your website to directly get in touch with you via Tuta's end-to-end encrypted contact form.
- 'Delete Account': Here you can delete the account. Your email address and aliases will be deleted and can't be reactivated. If you want to use your Tuta email addresses in another account, it is important to enter the 'Target account address' here. Then you can add the deleted email addresses to the stated target email account.
- Downgrade back to Free: You can unsubscribe from Premium, Teams or Pro here. Next to 'Subscription', click the pen icon and select the Free plan.

- Choose whether you are using Tuta for 'Private' use or for 'Business' use. This differentiation is necessary for tax regulations.
- Choose whether you want to pay 'Yearly' or 'Monthly'. When you choose 'Yearly', you get two months for free.
- Click on 'Select' of the package you want to upgrade to. This takes you to the payment procedure.

- Choose your payment method: Credit card or PayPal. Note: When choosing Tuta for Business, you can also pay via invoice. The invoice will be sent to your Tuta account and must be paid within two weeks time. In case of no payment being made, two reminders will be sent before the account is closed.
- Enter your payment details.
- Choose your country of residence.
- Click 'Next'.

- Once all payment data is entered, a booking summary will be shown.
- Check the summary and click 'Buy' to complete your order.

To upgrade a Free account (or downgrade), please go to Settings -> Plan -> Plan and click on the pen symbol. Then you can pick another plan (picture below).
Under Settings -> Plan, you can also sign the 'Order processing agreement' if you need to comply with the GDPR, switch your 'Payment interval' from monthly to yearly, check your price per year, and add more 'Extensions' or order gift cards.
- Click the user you want to manage to see all available 'User settings'.
- Click the adequate pen symbol to change the 'Sender name', the 'Password', the 'Global admin' status (Yes/No), 'Administrated by' (Global admin/Local admin), and the 'Status' of this user (Activated/Deactivated).
- Please note: Users can not be deleted. If you deactivate users, you are no longer billed for these. You can also add the email address(es) of deactivated users as aliases to your account.
- Global admins can access the user management and change the passwords of users that they have added to their account. Local admins see only the users that they have been assigned to administrate. They can manage these users, including changing their passwords. Changing passwords for other users only works within one paid account. We at Tuta have no access and cannot reset passwords.

- 'Second factor authentication': Click the plus symbol to the right to add a second factor for this user. Tuta supports U2F and TOTP for 2FA. Once added all second factors are displayed here. You can delete them by clicking the cross symbol next to each added key.
- 'Groups': Click on the plus symbol to add this user to a group. This option is only displayed once you have added a Group to your account. Refer to 'Groups: Local admin' to learn how to set up a group.
- 'Contact forms': Click on the plus symbol to add this user to a contact form. This option is only displayed once you have added a contact form to your account. Refer to 'Contact forms' to learn how to set up a contact form.
- 'Email aliases': Click on 'Show Email Aliases' to add alias email addresses or activate/deactivate existing aliases. Please note: Aliases with a Tuta domain can only be disabled, but not deleted. When you are using your own domain with Tuta, you can delete aliases with your own domain and add new ones.
- 'Notifications': Click on 'Show' and you will see all email addresses and the IDs of mobile devices (via the Tuta app) that receive push notifications about new mails received in the mailbox of this user. You can delete an entry if you do not wish to receive notifications to a particular email address or mobile device anymore.
When you order the Whitelabel feature, you have two options: The Whitelabel feature is already included in the Pro subscription. Alternatively, you can order it separately in your paid account. Your whitelabel domain can be any subdomain, and might look like 'secure.mycompany.com' or 'email.mycompany.com'. In order to setup whitelabel you must be able to set the CNAME DNS entry.
How to whitelabel your secure Tuta mailbox for business use

- 'Status': Click the pen symbol to activate the Whitelabel feature for your Tuta account.
- 'Custom notification emails': Click the plus symbol to add a custom notification email for external recipients. When configuring the custom notification email, the admin can add a {sender} placeholder in both subject and body of the email to include the sender name. The admin must include a {link} placeholder in the body of the email where the link to the encrypted mailbox of the external recipient is automatically being added.
- 'Whitelabel domain': Click the pen symbol to activate the Whitelabel feature. A pop-up shows up where you have to add your domain (shown in the screenshots):

- Choose a subdomain, at which you would like to reach the Tuta login. Create the subdomain by setting the CNAME DNS entry to point to login.tutanota.com at your domain hoster. The DNS entry should look like this: '< subdomain_name > CNAME login.tutanota.com'. Depending on your hoster you might have to set the fields 'name' to '< subdomain_name >', 'type' to 'CNAME' and 'value' to 'login.tutanota.com'. Keep in mind that the DNS changes may take a while until propagated.
- Enter this subdomain under 'Whitelabel domain'.
Whitelabel domain customizations
- 'Custom logo': Click the pen symbol to upload your logo. It will be shown in the top left corner (38x280 pixel) when you load Tuta on your website.

- 'Custom colors': Click the pen symbol to set the colors according to your own corporate design. If you don't set a color, the default color from the Tuta style sheet will be taken.
- 'Custom meta tags': Click the pen symbol to enter a meta tag: You can enter HTML code here to add a headline, text and a favicon.
- 'Link to legal notice': Here you can add a link to your Imprint.
- 'Link to privacy policy': Here you can add a link to your Privacy Policy.
- 'German language file': Selects the form of address for the login page on your website if someone opens it with a browser using the German language (Du/Sie).
Now you can open your website in your browser and see the Tuta login with your customizations.

- Click on 'Add group' at the top of the group list. A pop-up shows up. The group type can be chosen as 'Local admin'. Choose 'Local admin' if you want one of your users (e.g. a project manager) to administrate all users working on this particular project. Set a name for this group. Click OK. You have created a local admin group. Refer to 'Manage an existing local admin' to find out how to add users to this group.
Manage users

- Go to Settings → User management. You can see all the users that this local admin administers. Please refer to the section 'Manage an existing user' to see all available administrative options.
Manage groups

- Go here in Settings .
- Click the local admin you want to manage.
- Manage a local admin: To the right you have several options to manage this local admin. The local admin has less options compared to the global admin who originally set up this group. You can see this by comparing the local admin options:

- 'Name': Click the pen symbol to change the name of the group.
- 'Status': Click the pen symbol to activate/deactivate this group.
- 'Group members': Click the plus symbol to add as many group members as you like. This should be at least one as the Group member is the local admin of all added administrated groups.
- 'Administrated groups': This list contains all users administrated by the local admin added under 'Group members'. The local admin cannot add anything here.
- Click the local admin group you want to manage. To the right, you have several options to manage this group:
- 'Name': Click the pen symbol to change the name of the group.
- 'Administrated by': Local admin groups have to be administrated by a Global admin.
- 'Status': Click the pen symbol to activate/deactivate this group.
- 'Group members': Click the plus symbol to add as many group members as you like. This should be at least one as the Group member is the local admin of all added administrated groups/users.
- 'Administrated groups': This list contains all users administrated by the local admin(s) added under 'Group members'.
- Log in with the group member account (here: Bob) to see all the Settings options of the local admin.
Windows: Go to Settings > Apps > Default Apps to choose Tuta as you default email app.
Mac: Go to Settings -> Desktop -> set "Default email handler" to "Registered".
Linux: This depends on your distribution. Please refer to the relevant documentation. Useful keywords are "mailto handler", "protocol handler"
On all platforms, you may have to tell applications like your internet browser to use the system default mail app.
Mac: Double-click the installer and follow the instructions on your computer.
Linux: After downloading, right click the AppImage and give it execute permission. Alternatively, run chmod +x tutanota-desktop-linux.AppImage from a terminal window. Now you can run the App like any other executable, no further installation is required. You may want to let it integrate itself with your desktop and app launcher.
Windows: Double-click on the Tuta app and follow the instructions on your computer.
Enterprise mode (Windows): The desktop client can be installed on Windows in "enterprise mode" by passing the following flags to the installer:
- /S - Install silently (no wizard)
- /allusers - Install for all users on the system rather than just the current user (requires privilege escalation)
- /disableAutoUpdates - Disable automatic updates (updates would need to be done manually by an admin)
The application may also be uninstalled silently, by passing /S to the uninstaller (in the installation directory under Program Files).
Sometimes the browser does not recognize the newly installed Tuta desktop client as the default mailto app. If clicking a mailto-link does not open an email in the desktop client, please make sure that the Tuta desktop client is activated as the default email app in your system settings as described above.
If everything is set up correctly, these instructions might help to troubleshoot:
Firefox
- Enter "about:preferences" in the address field.
- Go to "Applications" -> mailto set to "Tuta Desktop" or "Standard"
- Enter "about:config" in the address field
- Set "network.protocol-handler.expose.mailto = true"
- Set "network.protocol-handler.external.mailto = true"
Chrome
- Enter "chrome://settings/handlers" in the address field
- Deactivate all handlers for emails
The Windows desktop client comes with MAPI support. Via the context menu of a file -> Send to... -> Email recipient - you can directly attach files to a new email.
In various programs (Office, Adobe Acrobat Reader, SAGE50) you can use the "Send document as mail" function and attach the currently opened file to a new email. You can find more details on our blog.
You need to activate the 'Run in background' option to receive notifications from the desktop client. This option appears in your notification area on Windows and in the Tray on Linux.
When it is active, the desktop client will not terminate when all windows are closed and instead remain in the background to provide desktop notifications in case of incoming email or calendar alarms.
If you can't see the tray icon on Linux despite the app running and the 'Run in background' option being set to 'Yes', please refer to your distribution's documentation to enable tray icons or AppIndicators. On MacOS, this option is not visible, and the dock icon is always used to provide a context menu.
If you still do not receive notifications, please check that you do not have focus mode, alarms only, or do not disturb modes on. You can also check the desktop settings of the client.
Windows: Hit the windows key, type "apps", choose the entry "Apps & Features". In the settings window, search for "Tuta Desktop". Click it and then click the "Uninstall" Button.
Mac: Right-click the Application in the Applications folder and select "Move to bin". To remove the app cache as well, you need to delete the directory ~/Library/Application Support/tutanota-desktop/, for example via the terminal:
cd ~/Library/Application\ Support/
rm -r ./tutanota-desktop
Linux:
Delete the AppImage, then delete the file
~/.local/share/applications/appimagekit-tutanota-desktop.desktopand the directory~/.config/tutanota-desktop/if they're present.If you want to remove the icons, too, open a terminal window and type
cd ~/.local/share/icons/hicolor/
ls **/*/appimagekit-tutanota-desktop.png
- Make sure the output only lists tutanota-desktop image files, then type
rm -i **/*/appimagekit-tutanota-desktop.png
The Tuta desktop applications for Linux, Windows, and Mac OS are signed. The signatures make sure that the desktop clients as well as any updates come directly from us and have not been tampered with. Upon every update, the desktop client automatically checks that the signature is valid.
You can verify the authenticity of your manually downloaded installer with the OpenSSL utility yourself as well. It should be installed on most Linux and Mac systems, but needs to be added to Windows, you can get OpenSSL via this link.
The installer signatures are provided as separate files:
For further details, please refer to GitHub, lines 12 to 21.
To apply for the 50% discount, please contact our sales team from your organization's email address and provide the following information:
- Short description of your NPO or school
- Link to your website
- Proof that you are a registered NPO or a school for general education
We will then send you a signup link for Tuta with the discount included. In case you already have a Tuta account you want to use for your NPO, please let us know the email address and we will configure the discount for that existing account.
In Tuta you can create an unlimited number of folders. Subfolders are currently not supported, but are planned for future release.
To add folders, please click the plus symbol next to 'Your Folders' in your mailbox. A pop-up opens where you can enter the folder name. The newly created folder will be sorted alphabetically under 'Your Folders'.
You can rename or delete existing folders by clicking on the three-dot button next to the folder.
You can sign up for a Tuta account in four easy steps.
You choose one of the available free or paid subscriptions.
You choose your new Tuta email address, set a password, and confirm that you have read our terms and privacy policy and that you are above 16 years old.
Then your account is being prepared. If applicable, you can add your custom domain later.
You choose a payment method, enter your payment details and confirm. If you registered a free account, this step is not required.
The last step is to make sure that you never lose access to your Tuta account: Tuta asks you to write down or print your recovery code. Please take the time to store your recovery code in a safe place. The recovery code is the only way to reset your password should you lose it in the future.
To get started, you need to pick one of the available Tuta domains for your account.
With any of the paid subscriptions, you can later add alias addresses and your custom domain to your new Tuta account.
Tuta uses its own Captcha so that we do not have to depend on using Google Captcha. This enables us to offer an open source email service without any links to Google.
The Tuta Captcha shows a clock. If applicable, you need to enter the displayed time with four numerals, including the colon in the middle. If the displayed time is 8.30 for example, you have to enter 08:30 or 20:30 exactly.
Tuta protects your private data by building the most secure email service. We do not track or sell your data and do not post ads. If you share our mission of making the web more private and secure, please upgrade your Free Tuta account. You will not only support an amazing service, but you will also get lots of extra features.
In you mailbox, go to 'Settings' -> 'Email' -> 'Inbox rules'
Under 'Inbox rules' (filters) click on 'Show Inbox Rules' and then on the plus-button. A pop-up with three options opens: 'Field', 'Value', and 'Target folder'.
- Field: Click on the pen symbol to define what field should be used for the inbox rule 'Sender', 'To recipient', 'Cc recipient', 'Bcc recipient', 'Subject contains', or 'Header contains'.
- Value: You can enter text such as an email address, a domain name, or the required content of the subject or header.
- Target folder: Click the pen symbol to define what folder the specified mails should be moved to automatically upon hitting your inbox.
- For inbox rules we support JavaScript regular expressions. You have to enclose the expression with slashes / like the literal definition of regular expressions. More information can be found here.
You can sign up for a Tuta account in four easy steps.
Please choose one of the available paid subscriptions.
Choose your new Tuta email address, set a password, and confirm that you have read our terms and privacy policy and that you are above 16 years old.
Then your account is being prepared. If applicable, you can add your custom domain later.
Choose a payment method, enter your payment details and confirm.
The last step is to make sure that you never lose access to your Tuta account: Tuta asks you to write down or print your recovery code. Please take the time to store your recovery code in a safe place. The recovery code is the only way to reset your password should you lose it in the future.
To get started, you need to pick one of the available Tuta domains for your account.
With any of the paid subscriptions, you can later add alias email addresses and your custom domain to your new Tuta account.
Tuta uses its own Captcha so that we do not have to depend on using Google Captcha. This enables us to offer an open source email service without any links to Google.
The Tuta Captcha shows a clock. If applicable, you need to enter the displayed time with four numerals, including the colon in the middle. If the displayed time is 8.30 for example, you have to enter 08:30 or 20:30 exactly.
An email alias is an additional email address that you can use within your mailbox. Tuta lets you add five or more aliases in any of the paid versions. You can use these alias email addresses for both receiving and sending secure emails.
Alias email addresses can be set up if you would like several email addresses to be linked to one inbox.
For example, as a private user, you might want to have different alias addresses for different purposes, e.g. youraddress@tutanota.com, shopping.youraddress@tutanota.com, newsletters.youraddress@tutanota.com etc.
As a business, you might want several email addresses for different purposes to go to one centrally managed inbox, e.g. support@yourcompany.com, sales@yourcompany.com, jobs@yourcompany.com etc.
As a family or organization using Tuta, you can set up users for each family member or employee. These users get a separate mailbox, including contacts and calendars, accessible via their personal login credentials.
When you sign up for Tuta, you create an email account. This account initially has a single user which is also an administrator. With any paid subscription, you can add multiple users to your account. As an admin you can manage the users (deactivate a user, change a password or remove a second factor). You may also allow multiple users to be administrators.
To learn how to set up a user or create an alias, watch this YouTube tutorial.
First you need to complete the setup process of your custom domain.
Go to Settings -> Global Settings -> Custom email domains.
Next to each custom email domain is a three dot symbol. When you click it, you can select 'Set a catch all mailbox'. Then you need to choose to which email address and, consequently, to which of your inboxes catch-all mails should go to. This is usually your main admin, but can be any user that you have added to your account.
Once you have set up your catch-all email address, all emails that are being sent to your own domain that do not match any existing email address will be delivered to this catch-all inbox.
Tip: If your domain got leaked to spam lists, we recommend that you set up a dedicated user within your Tuta account for receiving catch-all emails, e.g. catchall@yourdomain.com.
A catch-all email address lets you receive all emails sent to your custom domain – even if the sender mistyped your email address.
In Tuta you can set up a catch-all email address with any paid subscription.
If you have a large number of users, you can import a CSV file containing user name, email address and password. This is useful to automatically create all users in a single step.
To import all users via CSV, you need to create a CSV file with the items 'name', 'email address' and 'password' that contains all users for your company. Then you login with your admin to Tuta and go to 'Settings' → 'User management' → '...' → 'Import Users'
You can then provide the user passwords to the users, so they can log in into their individual mailboxes.
I can't access my account
If you can't log in to your account you might be in one of these situations:
- You have made a typo in your email address or password:
- Please double check your address and make sure that you have typed the full address and the correct domain name (for example youraddress@tutanota.com).
- Make sure that the Caps Lock key is not active.
- You forgot your password or lost your second authentication factor (2FA): Please read How do I reset my password or second factor?
- The code from your authenticator App (TOTP) is incorrect: These codes are time-dependent. Please make sure that both Tuta and the authenticator App have the correct time and time zone settings. Some browsers or browser extensions block access to the system's time zone.
- Your recovery code is not accepted or is wrong: Please double check whether you are using the recovery key correctly. See How do I use the recovery code?
- Your account might have been deleted due to inactivity: In this case, you should see a corresponding message below the login form. Free accounts are deleted if you do not log in for a period longer than six months. We do not recycle Tuta addresses which means that the address is blocked for new registrations. You can still re-use the deleted address with a paid account, but only if you have the correct credentials for the deleted account. Please see How do I reactivate an account deleted due to inactivity?
- Your account was suddenly suspended due to another reason: Some accounts are disabled due to a violation of our Terms of Service or due to our spam detection. If you think that we have made a mistake, please contact us in English or German. Please include the email address of your suspended Tuta account and send us the error message you see below the login form.
Our secure password reset feature allows only you to reset your password. We have no influence on this process. You can read more about this here.
I would like to report abuse
Please forward the abusive message with a short explanation in English or German to our abuse team.
I have a business request
Please contact our sales team in English or German.